What is an Amazon product listing page?
The Amazon product listing serves as a dedicated webpage where prospective shoppers can assess and ultimately buy your product. It encompasses crucial information, including the product’s title, description, features, pricing, and images.
Additionally, it incorporates valuable components such as reviews, ratings, and customer inquiries to aid customers in making informed purchasing decisions.
Meticulously creating and optimizing your product listings on Amazon can significantly expedite the growth of your e-commerce business, allowing you to reach a broader customer base and maximize your sales potential.
Sure, let’s get started with creating your first Amazon product listing. Here is a step-by-step guide to help you through the process:
A step-by-step guide to creating an Amazon listing for new products
Crafting a high-performing Amazon product listing doesn’t have to be a complex process. By following these steps, you can efficiently create and launch your product listing:
- Research and Competitor Analysis: Start by researching your product niche and analyzing successful competitors’ listings. Identify what sets them apart and understand their strategies to gain insights for your own listing.
- Keyword Research: Conduct thorough keyword research to identify relevant and popular search terms for your product. Incorporate these keywords strategically in your listing’s title, bullet points, description, and backend search terms to improve discoverability.
- Compelling Product Title: Create a concise and compelling title that includes relevant keywords. Highlight the key features and benefits of your product while adhering to Amazon’s character limits.
- Engaging Product Images: Capture high-quality product images that showcase your product from different angles. Ensure the images are clear, visually appealing, and meet Amazon’s image requirements.
- Informative Bullet Points: Use bullet points to succinctly highlight the key features, benefits, and unique selling points of your product. Make it easy for customers to grasp the value your product offers.
- Detailed Product Description: Craft a detailed and informative description that provides accurate information about your product. Clearly explain its features, specifications, dimensions, and how it can solve customers’ problems or fulfill their needs.
- Competitive Pricing: Research your competitors’ pricing strategies and set a competitive price for your product. Consider factors such as manufacturing costs, shipping fees, and desired profit margins.
- Fulfillment Method: Decide whether you will handle order fulfillment yourself (Merchant Fulfilled) or utilize Amazon’s fulfillment service (Fulfillment by Amazon – FBA). Each method has its advantages and associated fees, so choose the option that aligns with your business goals.
- Optimize Backend Keywords: Utilize the backend search terms section to include additional relevant keywords that customers may use to find your product. These keywords are not visible to customers but can improve your product’s search visibility.
- Product Variation Management: If your product has different variations (e.g., size, color), create separate listings for each variation. Clearly differentiate the options and ensure customers can easily select their preferred version.
- Reviews and Ratings: Encourage customers to leave reviews and ratings for your product by providing exceptional customer service and promptly addressing any issues. Positive reviews and high ratings enhance your product’s credibility and attractiveness to potential buyers.
- Continuous Optimization: Regularly monitor your product listing’s performance, gather customer feedback, and make necessary improvements. Stay updated with market trends, adjust your listing accordingly, and iterate based on customer preferences.
By following these steps, you can create a compelling and effective Amazon product listing that increases your chances of success and drives sales. Remember to regularly analyze your listing’s performance and make adjustments as needed to stay competitive in the marketplace.
Conduct keyword research
Absolutely! Conducting comprehensive keyword research is a crucial step in optimizing your Amazon product listing. Here’s a breakdown of how you can compile a list of relevant keywords using tools.
- Start with Seed Keywords: Begin by brainstorming a list of seed keywords that are directly related to your product. These are the primary keywords you believe customers would use to search for your product.
- Use Keyword Research Tool: Input your seed keywords into Keyword Research Tool. This tool will provide you with a list of related keywords along with data on their search volume, relevance, and competition. Sort the keywords based on relevancy and volume.
- Select Top 4-5 Keywords: From the list generated by the tool, identify the top 4-5 keywords that are highly relevant to your product and have a significant search volume. These keywords should accurately represent your product and align with your target audience’s search behavior.
- Analyze Competitors’ Listings: Utilize the Reverse ASIN tool to analyze your competitors’ listings. Enter the ASIN (Amazon Standard Identification Number) of a competing product that is similar to yours. The tool will generate a list of keywords that the competitor is ranking for.
- Identify High-Performing Keywords: Analyze the keywords extracted from your competitors’ listings and identify the high-performing ones that are relevant to your product. These keywords can give you insights into what customers are searching for and help you optimize your own listing.
- Incorporate Keywords in Your Listing: Once you have compiled a comprehensive list of relevant keywords, strategically incorporate them into your product listing. Place them in the title, bullet points, product description, and backend search terms to improve your product’s visibility in Amazon search results.
Remember to regularly monitor and update your keyword list based on changing market trends, customer preferences, and new keyword opportunities. Optimization is an ongoing process that can significantly impact your product’s discoverability and sales performance on Amazon.
Here’s a step-by-step approach:
- Identify Competitors’ ASINs: Find three competitors in your niche whose products are similar to yours. Collect their ASINs (Amazon Standard Identification Numbers), which you can typically find in their product URLs or on their product listings.
- Use the Reverse ASIN Tool: Visit the Reverse ASIN tool of your choice. Enter one competitor’s ASIN at a time and run the search. The tool will generate a list of keywords that the competitor’s listing ranks for.
- Filter by Relevancy and Search Volume: Filter the keyword results based on relevancy and search volume. Look for keywords that are highly relevant to your product and have a decent search volume. These are the keywords that are more likely to attract potential customers.
- Select Top 4-5 Keywords: From the filtered list, choose the top 4-5 keywords that best align with your product and target audience. Consider a mix of long-tail and short-tail keywords to cover a range of search intents.
- Long-Tail Keywords: Incorporate long-tail keywords into your keyword list. These specific phrases may have lower search volumes, but they often lead to higher conversion rates as they cater to customers with clear intent. Include long-tail keywords that describe the unique features, benefits, or use cases of your product.
- Short-Tail Keywords: Include short-tail keywords in your keyword list to boost your brand’s visibility. These broader search terms have higher search volumes but may have lower conversion rates. Use short-tail keywords that represent your product category, industry, or generic terms that customers may use to discover products like yours.
- Keyword Placement: Integrate the selected keywords into your product listing, including the title, bullet points, product description, and backend search terms. Ensure the keywords are used naturally and don’t compromise the readability and coherence of your listing.
Remember to monitor the performance of your keywords over time, make adjustments based on customer search behavior and market trends, and continuously optimize your listing to maintain a strong SEO strategy.
Log in to Amazon Seller Central
Sign up for an Amazon Seller Account:
Visit the Amazon Seller Central website and create an account as a seller. You can choose between an individual seller account or a professional seller account, depending on your needs.
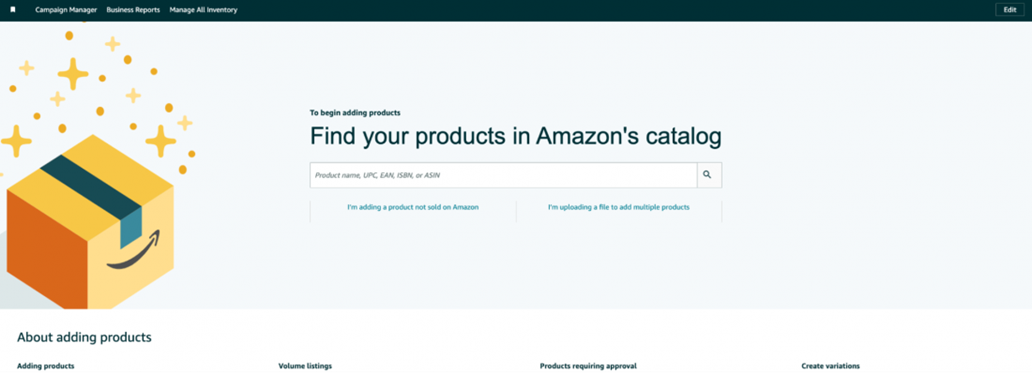
Log in to Amazon Seller Central, open the left sidebar, and go to Catalog → “Add products.”

When you navigate to the “Add Product” page on Amazon, you will encounter two options for listing your products:
- “I’m adding a product not sold on Amazon”:
Select this option when you are listing a new product that is not currently available on Amazon. It is the appropriate choice when you want to create a new product listing from scratch. This option allows you to input all the necessary details, including product information, images, pricing, and other relevant information specific to your product.
- “I’m uploading a file to add multiple products”:
Choose this option when you have multiple products to list and want to upload them in bulk. This option is particularly beneficial for business models like Amazon dropshipping or retail arbitrage, where you may have a large inventory to list at once. With this feature, you can prepare a file (usually in CSV or Excel format) that contains the necessary information for each product, such as SKU, title, description, price, and other attributes. You can then upload this file to Amazon, and the platform will create product listings based on the information provided in the file.
By selecting the appropriate option based on your needs, you can efficiently list new products or bulk upload multiple products on Amazon, depending on your business model and inventory management requirements.
We’ll choose the first option.

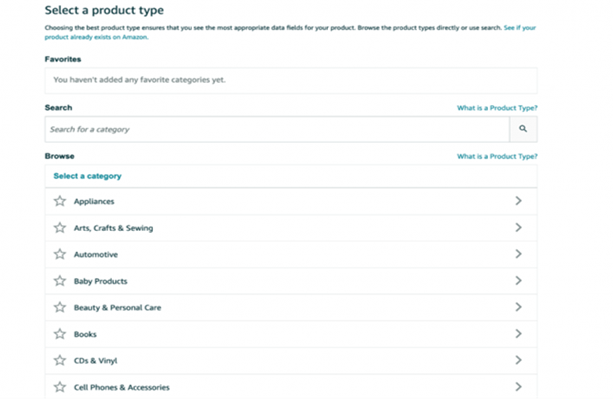
When selecting the appropriate category and subcategory for your product on Amazon, you have two methods to choose from:
-
Search Method:
With the search method, you can directly search for your product type and select the category that best aligns with your product. Follow these steps:
- On the “Add Product” page, use the search bar provided.
- Enter relevant keywords related to your product type or specific product.
- Amazon will display search results that match your keywords.
- Review the search results and select the category that closely matches your product.
Consider factors such as relevance, product type, and the categories where your competitors’ products are listed.
-
Manual Method:
If you prefer a more systematic approach, you can manually navigate through the category hierarchy to find the most appropriate category and subcategory for your product. Follow these steps:
- On the “Add Product” page, select the parent category that best represents your product from the list provided.
- Amazon will display a list of subcategories under the selected parent category.
- Explore the subcategories and select the one that accurately describes your product.
- If needed, continue navigating through additional subcategories until you find the most relevant subcategory for your product.
When choosing the category and subcategory, ensure that you select the most accurate and specific option that closely matches your product. This helps potential customers find your product more easily when browsing or searching within specific categories.
Consider factors such as the nature of your product, its intended use, and the categories where similar products are typically listed. Choosing the most appropriate category and subcategory can improve the visibility and discoverability of your product on Amazon.
Fill in the product information.
The listing information dashboard is divided into eight tabs.
- Product Identity
- Vital Info
- Offer
- Product Details
- Variations
- Images
- Keywords
Certainly! Let’s go through each tab and fill in the required details for your product listing.
Product Identification:
This information helps Amazon categorize and display your product correctly.
- Product Name: Enter the name of your product
- Manufacturer: Enter the name of the manufacturer
- Brand Name: Enter the brand name
- Manufacturer Part Number: [Enter the manufacturer part number
- Recommended Browse Node: [Choose the appropriate browse node based on your product category]
Amazon may ask you to provide evidence if the brand is not registered. You can submit images of your product and it’s packaging with your brand name.
Pro Tip: If you’re serious about your e-commerce business, register your Brand on Amazon, as it also boosts your ranking and conversion rate.
Vital Info:
- Product ID: [Enter the product ID, such as UPC, EAN, ISBN, or ASIN]
- Product ID Type: [Select the type of product ID you entered e.g., UPC]
- Condition: [Choose the condition of your product, such as new, used, refurbished]
- Manufacturer Warranty Description: [Enter the warranty details provided by the manufacturer]
- Item Package Quantity: [Enter the quantity of items included in the package]
A UPC code is required for sellers based in the USA, while those in Europe must provide an EAN number. You can get the codes from the GS1 portal.

Offer:
In the offer tab, provide the following information:
- Standard Price: [Enter the standard price for your product]
- Quantity: [Enter the quantity of products available for sale]
- Sale Price: [Enter the sale price, if applicable]
- Condition: Choose the product’s current condition that you intend to sell- new, used, or otherwise.
- Fulfillment Channel: Now, it’s time to choose the order fulfillment method. This determines if you will be listed as an Amazon FBAor FBM seller. You have two options:
- Fulfilled by Amazon: Amazon takes care of all the shipping and customer service in exchange for a small fee.
- Merchant Fulfilled: You handle shipping and customer service yourself.
Product Details:
In the product details tab, fill up details about your product bundle, for example:
- Manufacturer: Enter the name of the manufacturer
- Brand Name: Enter the brand name
- Manufacturer Part Number: Enter the manufacturer part number
- Model: Enter the model number, if applicable
- Color: Specify the color of the product
- Size: Specify the size of the product, if applicable
- Product Description: Write a detailed description of your product
- Number of items: Give how many items you’re selling under each unit
- Color: Provide what’s the color of the product
- Included components: Specify the components included in the product.
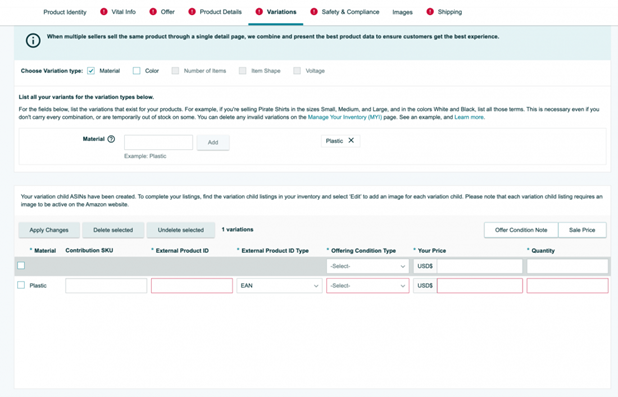
Variations:
Only make changes in the “Variation” tab if you’re selling multiple variations of your product, such as different colors or sizes, materials, etc. This section allows you to add specific details for each variation, which allows you to organize and manage them seamlessly.
The options in variations will be different based on different categories. To simplify the process, here are some variations you’ll find on Amazon in general:
- Color
- Size
- Number of items
- Material
Similar to product details, for each variation, you need to add the following details:
- Product ID
- Offering condition
- Price
- Quantity
Product Images:
Main Image: Upload the main image of your product
Other Images: Upload additional images showcasing your product from different angles or features
Capture high-quality images of your product from multiple angles. Amazon has specific image requirements, so make sure your images meet those guidelines. Clear and visually appealing product images can significantly impact the success of your listing.
Here are some tips for adding product images:
- Every detail page must have at least one product image. However, aim for six images and one video in the listing for optimum results.
- Ensure the images are clear, informative, and appealing to the eyes.
- Keep the image background white and ensure the product occupies at least 85% of the image space.
- Keep the image dimensions as 500 x 500 or 1000 x 1000 pixels to ensure optimum quality.
You can also evaluate the image qualities by asking the following questions:
- Does the image match the product description in size, color, and accuracy?
- Is the product recognizable in the image?
- Is the photo a high-resolution photograph, not a drawing?
- Was the photo taken at a flattering angle?
- Is the product focused and well-lit?
- Are close-up shots free from highlights or shadows?
- Does the image show the entire product?
- Is the background simple and clean?
Keywords:
In the “Keyword” tab, fill up the following two fields:
- Target Audience: Enter your target audience for the product.
- Subject Keywords: These are the most important field in your listing. These are also called backend keywords. These keywords improve the discoverability of your products and allow you to create a readable product listing while ensuring the listing is indexed for all the relevant keywords.
Here are some tips to add these subject keywords:
- Use only generic words
- Include synonyms, abbreviations, and alternative names for your product
- Add only six keywords
- Enter phrases in a logical order of search
- Include applicable spelling variations, but avoid common misspellings
- Use all lowercase letters and skip punctuation such as hyphens and colons
- Avoid repeating words
- Avoid stop words like “a,” “an,” “and,” “by,” “for,” “of,” “the,” and “with.”
- Use singular or plural, but not both.
Furthermore, check our Amazon backend keyword guide to learn more about these keywords.
Write a Compelling Product Title:
This is the product title shoppers would see in the product listing. Create a concise and informative title that includes relevant keywords. Highlight the key features and benefits of your product while adhering to Amazon’s character limits.
Here are some points to keep in mind while giving the product title:
- Make sure the product title matches the physical packaging of your product.
- Capitalize the first letter of each word except for prepositions, conjunctions, or articles.
- Keep the title detailed, with a keyword, brand name, at least one benefit, and other details if possible. The recommended title length is 80 to 200 characters.
- Use numerals like “2” instead of “two.”
- Don’t use non-language ASCII characters like Æ, ©, or ®.
- Don’t use promotional phrases like “Hot Item,” “Best Seller,” or Free shipping worldwide.
- Punctuation like hyphens, forward slashes, commas, ampersands, and periods are okay to use in titles.
- You can use abbreviations for measurements like “cm,” “oz,” “in,” and “kg.”
- Include the size and color variations in the product titles for your child’s ASINs.
Review the product title requirements and follow the criteria to appear in relevant searches and avoid search suppression.
Note: Start the title with your brand name and your primary keyword, as Amazon will automatically generate canonical URLs based on the title you give.
A canonical URL is a specific URL on Amazon used to display a product details page. For example: “amazon.com/Gillette-Fusion-Manual-Sharp-Razors/dp/B001A8ADE0.”
Write a Detailed Product Description:
Craft a compelling and detailed description that provides accurate information about your product. Include its features, specifications, dimensions, and any unique selling points. Incorporate relevant keywords naturally while ensuring the description is easy to read.
Here are some tips to give a high-quality product description:
- Include brand name
- Include specifications such as size and color
- Give material specifications
- Include details about packaging and quality, etc.
Note:
If you’re a brand registered seller, add A+ content to your listing to make it more engaging to the shoppers.
A+ content can increase conversion rates and boost sales by providing a better understanding of the product and persuading customers to purchase.
This feature also presents an excellent opportunity for sellers to differentiate their products from similar offerings by competitors. Previously, differentiation was a significant challenge due to limited guidelines from Amazon.
To create the A+ content, log in to your seller central account → Go to Advertising and click on A+ Content Manager.
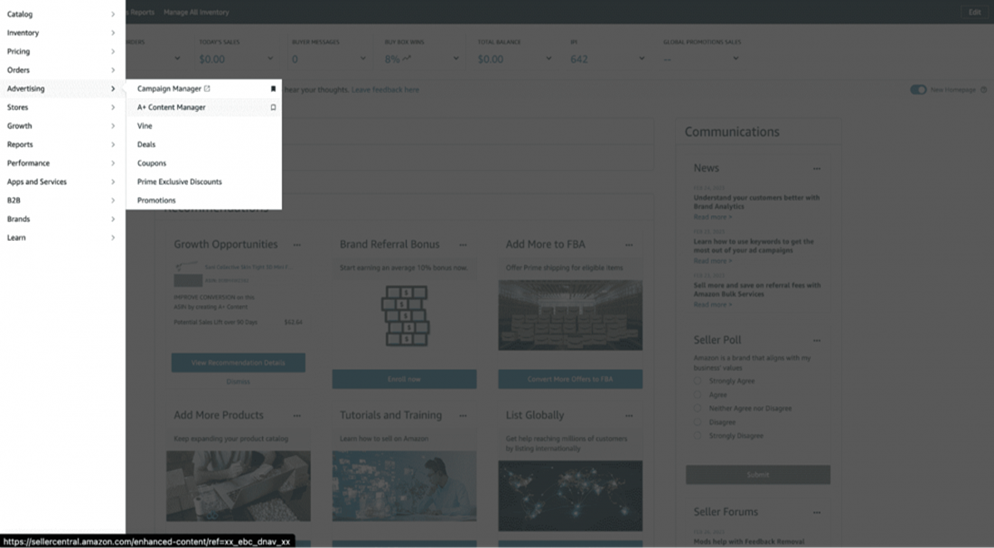
Choose from the two options below:
- Basic: This option lets you create five modules of enhanced content to highlight your product features.
- Brand Story: You can create a brand story with a custom brand logo, picture, description, and frequently asked questions about your brand.

Select an option based on your goal, add the required modules, select the ASIN to apply, and submit it for review.
Amazon will review the A+ content within seven days and make it live on your selected ASIN’s listings.
Learn more about it from the detailed A+ content Guide.\
Bullet points
Next, you must add bullet points to the Amazon product listing. These points appear next to the product images and describe your product benefits in detail. You can use relevant keywords in these bullet points to improve your product ranking in the search result.
Here are some more tips for creating the bullet points:
- Start each bullet points with a capital letter.
- Sellers can add five bullet points, and vendors are allowed to add ten bullet points.
- Write as sentence fragments, and do not use ending punctuation.
- Describe five features and benefits of your product in the bullet points
- Ensure all the bullet points have a similar length, not too long or short.
- Avoid using promotional content, discounts, and offers in the bullet points
- Don’t use HTML or other coding elements to create fancy symbols or emojis in the bullet points.
Set a Competitive Price:
Research your competitors and price your product competitively. Consider factors like manufacturing costs, shipping fees, and desired profit margins. Keep in mind that pricing strategies may vary depending on your goals, such as gaining market share or maximizing profit.
Fulfillment Method:
Decide whether you will fulfill orders yourself (Merchant Fulfilled) or use Amazon’s fulfillment service (Fulfillment by Amazon – FBA). FBA can simplify logistics and provide additional benefits, but it comes with associated fees.
Shipping and Inventory:
Set up your shipping preferences and manage your inventory. Specify the shipping methods, rates, and regions where your product will be available. Monitor your inventory levels to ensure timely restocking.
Submitting the Listing:
Now it’s time to review it, and hit the “Save and finish” button to create your product listing. Amazon will typically review and approve your listing within a few hours to a few days.
How to list products on Amazon in bulk?
If you find yourself in a situation where you need to list hundreds of products on Amazon, manually adding each product can be incredibly time-consuming. Thankfully, Amazon offers a convenient solution: the bulk listing feature. With this feature, you can create multiple product listings simultaneously, saving you valuable time and effort.
1: In the “Add Product” page in Seller Central, choose the “I’m uploading a file to add multiple products” option.
2: Download the excel template based on your requirements. Amazon provides you the templates for the following situations:
- List products already in Amazon’s catalog
- List products not currently in Amazon’s catalog
- Update price & quantity
- Update product details
- Not sure if the products are in Amazon’s catalog
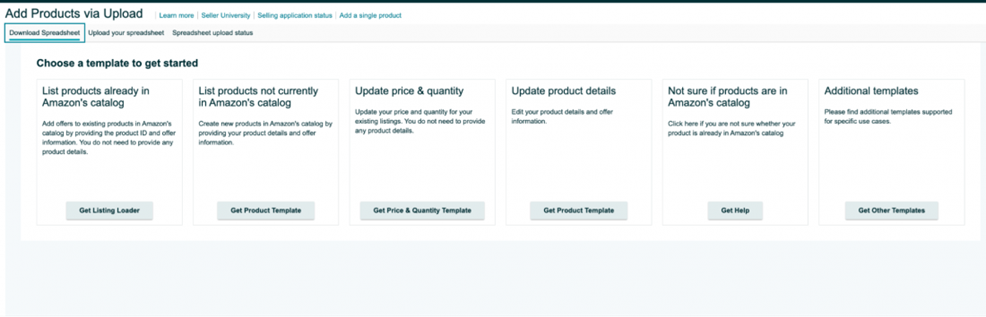
3: Select the option relevant to your requirements, choose the product category, and generate a template.
4: Once the template is downloaded, fill in all the columns and upload the spreadsheet to the Seller Central dashboard.
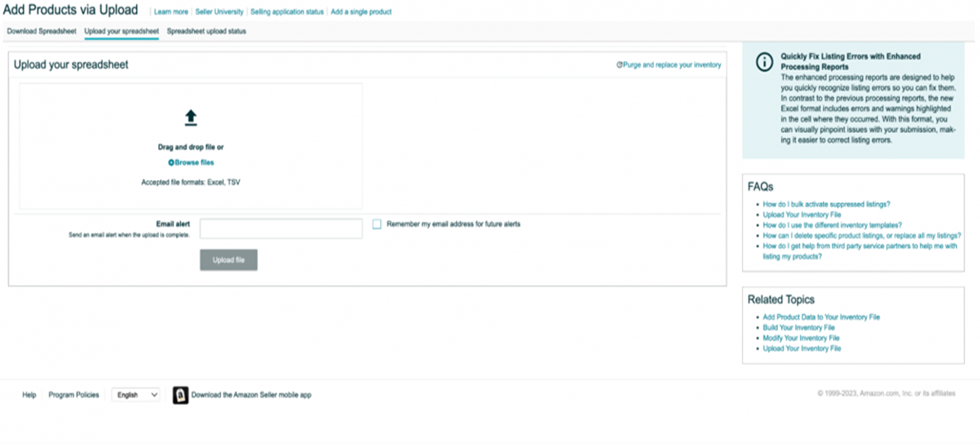
5: You can also check the upload status of your products from the “Spreadsheet Upload Status” tab.
How to list a product that is already existing on Amazon?
To list a product that already exists on Amazon, you can follow these steps:
- Sign in to your Amazon Seller Central account.
- Go to the “Inventory” tab and select “Add a Product” from the drop-down menu.
- In the search box, enter the name or unique identifier (such as UPC, EAN, ISBN, or ASIN) of the product you want to list.
- Amazon will display a list of matching products. Look for the one that matches your product and click on it.
- On the product listing page, click on the “Sell Yours” button or a similar option.
- You will be directed to the “Offer” page, where you can provide details about your specific product listing, such as its condition, price, quantity, and shipping options.
- Fill in all the required information, ensuring accuracy and completeness.
- If your product has variations (e.g., different sizes or colors), you can add them on the “Variations” tab.
- Upload high-quality product images that meet Amazon’s guidelines.
- Review all the information you have provided and make any necessary edits.
- Once you are satisfied with the listing, click on the “Save and Finish” button to publish it on Amazon.
It’s important to note that when listing a product that already exists on Amazon, you will be creating a new offer for that product. This means you will have your own listing page, separate from other sellers offering the same product.
Why is your new listing not visible on Amazon?
Experiencing issues with your listing not showing up on Amazon can indeed be frustrating for sellers. There are several factors that can contribute to this problem, including:
- Violating Amazon’s Policies: If you violate Amazon’s policies or terms of service, such as listing prohibited items, engaging in fraudulent behavior, or manipulating customer reviews, your products may be delisted.
- Poor Product Quality: If your product consistently receives negative reviews or feedback due to poor quality or performance, Amazon may delist it to protect customer satisfaction.
- Intellectual Property Infringement: Selling products that infringe on another company’s intellectual property rights, such as trademarks or copyrights, can result in your products being delisted.
- Safety Concerns: If your product poses safety hazards to customers or fails to comply with safety regulations, Amazon may delist it to prioritize customer safety.
- Selling Counterfeit Products: If Amazon determines that you are selling counterfeit products, your listings will be delisted, and your account may face suspension or termination.
- Inaccurate Product Information: Providing inaccurate or misleading product information can lead to delisting, as it compromises the integrity of the Amazon marketplace.
- Listing Restricted Products: If you list products that are restricted or prohibited by Amazon’s policies, your listings may be delisted.
To address these issues and increase the visibility of your listings, it is crucial to adhere to Amazon’s policies, ensure product quality, provide accurate information, and comply with all applicable regulations. Regularly monitor customer feedback, address concerns promptly, and maintain transparency in your business practices to avoid delisting and maintain a positive seller reputation on Amazon.
What to do if the product is delisted on Amazon?
If your product has been delisted on Amazon, here are some steps you can take to address the issue:
- Review the Delisting Notification: Carefully read the notification or email you received from Amazon regarding the delisting of your product. Understand the reason behind the delisting, as it will help you take appropriate actions.
- Contact Amazon Seller Support: Reach out to Amazon Seller Support through Seller Central and inquire about the specific reason for the delisting. Ask for clarification and any additional information that can assist you in resolving the issue.
- Rectify Policy Violations or Issues: If the delisting was due to a policy violation or non-compliance with Amazon’s guidelines, take immediate action to rectify the issue. This may involve removing prohibited content, addressing safety concerns, resolving intellectual property disputes, or improving product quality.
- Make Necessary Corrections: If the delisting was due to inaccurate product information, make the necessary corrections to ensure accurate and transparent details. Update your product listings with precise descriptions, correct categorization, and any other required information.
- Appeal the Delisting Decision: If you believe that the delisting was done in error or if you have rectified the underlying issue, you can consider submitting an appeal to Amazon. Prepare a detailed and persuasive appeal, clearly explaining the steps you have taken to address the problem and prevent its recurrence. Follow Amazon’s guidelines for submitting an appeal and provide any supporting documents or evidence that can strengthen your case.
- Follow Up with Amazon: After submitting your appeal, closely monitor your email and Seller Central messages for any communication from Amazon. Be responsive and provide any requested information promptly. If needed, escalate the issue to higher levels of support or seek guidance from Amazon’s Performance or Policy teams.
- Improve Compliance and Quality: Take this opportunity to evaluate your business practices, product quality, and adherence to Amazon’s policies. Implement measures to ensure ongoing compliance and maintain high-quality standards.
Nutshell
In the fast-paced and competitive world of Amazon selling, effectively listing and managing your products is crucial for success. When faced with the task of listing numerous products, utilizing Amazon’s bulk listing feature can save you valuable time and effort. However, it’s important to ensure accuracy and adherence to Amazon’s policies in every listing.
If you encounter the frustration of a delisted product, understanding the reasons behind it is the first step towards resolution. Communicating with Amazon Seller Support, rectifying any policy violations or quality issues, and appealing the delisting decision, if necessary, can help reinstate your product on the platform.
Throughout the process, it’s crucial to maintain open communication, professionalism, and a commitment to compliance and quality. Use delisting experiences as learning opportunities to improve your business practices and optimize your product listings. Stay informed about Amazon’s policies and guidelines to stay ahead of potential issues.
Remember, successfully listing and maintaining your products on Amazon requires ongoing effort and attention to detail. By staying proactive, addressing issues promptly, and continuously striving for compliance and quality, you can enhance your chances of sustained success on the platform.
